
These instructions assume that you have a folder containing the original images somewhere on your desktop or hard drive. Your photos must already be in the correct orientation (upright) before beginning the process of resizing images based on our tutorials.
If you would like to enable the zoom feature you must include a folder called ‘hires‘ along with ‘images’ and ‘thumbnails’ folders created by your image resizing software such as photoshop. Place all three of these folders within a main folder (perferably on your desktop) before you upload it via FTP. This desktop folder name will be your client’s password or session ID. Also enable the zoom feature option within your Marketing Control Site settings.
- Download the action script we have created for you in order to create the hires folder (or you can create your own actions within photoshop).
Download Photoshop Action Script.
Requirements:
- Adobe Photoshop version 5.5 or above and an FTP program. We recommend FileZilla.
- Use only alphanumeric characters (a-z and 0-9). DO NOT use spaces, underscores, dashes or any other special characters when naming your session folder. However, dashes and underscores are acceptable in the image file name just not for the session ID / password.
- We recommend that you use only lowercase letters, but if you do use a combination of capital and lowercase letters you will need to relay that exact spelling to your clients. Session IDs are case sensitive.
- We recommend large images to be sized down to 525px in height (800px width with Web Photo Gallery) Other programs that we don’t support may allow you to size images even larger but can be no wider than 925px as a maximum.
- We recommend thumbnails sized at 110px for height and width.
- OPTIONAL: If you want to embed your own watermark in your images there is a setting in the Web Photo Gallery to select “Security” and allows you to change your preferences to use custom text, color of the text, and alignment.
Instructions
Install the Photoshop Actions.
For those unfamiliar with Photoshop actions, they’re simply pre-recorded tasks that you can save and reuse anytime. Photoshop actions commonly have an .atn file extension. Installing a Photoshop action for more recent versions of Photoshop is easy: simply drag the .atn file onto the Actions palette or place it directly inside your Program Files (Applications) / Adobe Photoshop / Presets / Photoshop Actions folder.
1) Create a folder on your desktop called ‘hires’ and also place a copy of the folder that contains your original images. (usually easier to locate on your desktop rather than browsing your hard drive folders). Make sure there are no spaces, commas, ampersand sign, or other special characters in the names of your original images. These high res image names MUST match the names of your thumbnails and large images.
2) Once you open photoshop, click File > Automate > Batch.
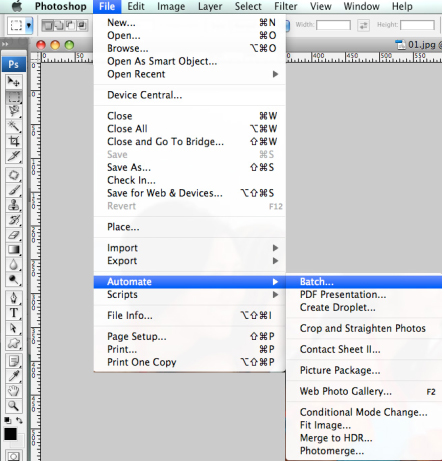
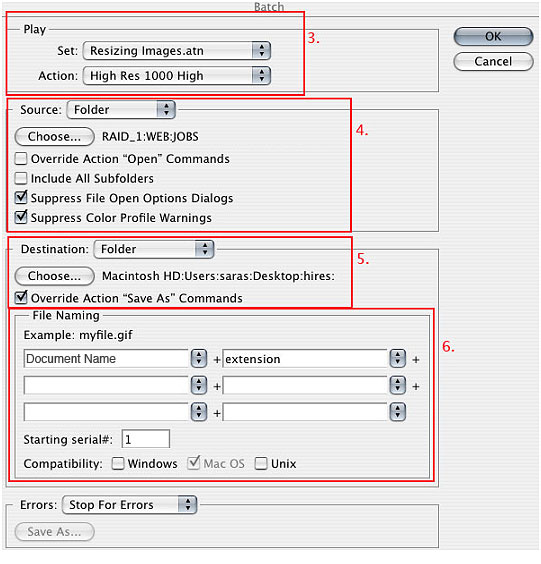
3) In the Batch dialog box > Play section, choose Resizing Images.atn from the Set drop-down menu and set the resolution for your images in the Action drop-down. (Only available when you create your action scripts or downloaded Marathon’s)
Suggested Image Size:
800 px high – For close-up images (like seniors).
1000 px – 1200 – use your best judgment (try a few images before doing a batch job).
1400 px high – For large group pictures.
4) From the Source drop-down menu choose Folder and specify the location your original files are located by clicking the Choose button and navigating to that folder. We suggest placing a copy of the original image folder on your desktop for easier navigation.
5) From the Destination drop-down menu choose Folder and specify the destination folder for the new files by clicking Choose button and navigating to the new empty folder. (should name this empty destination folder “hires”) Doing this we will keep our original files untouched and we will create the new ones in the destination folder. Make sure there is a checkmark in the Override Action “Same As” Commands.
6) In the File Naming section be sure to change the first drop-down to “document name” and the next field to the right says “extension” in order to define a file name.
Click OK and the Batch automation action will do the whole job for you – creating a new copy of each file from the Source folder as well as resizing and renaming them.
Now you are ready to upload the high resolution images in with your existing sessions folder.
Your new session folder should be on your desktop and inside this folder you have two folders – images and thumbnails. Now you can drag your ‘hires’ folder you just created following the above instructins into that session folder on the desktop.
Last step is to connect to your FTP program and upload the new session ID folder into your proofs directory, which now includes images, thumbnails, and hires to allow your clients to zoom in on the images. If you have not created your thumbnails and large images folder, please size your session images following the instructions in Uploading Sessions.